
Custom SMTP lets you connect any email provider to ColdSend using your own SMTP and IMAP credentials. This is ideal when you use providers like Zoho, Namecheap, cPanel, Fastmail, or any mail server that supports SMTP/IMAP access. You can add accounts one at a time or import dozens at once via CSV.
Prerequisites
Before you begin, make sure you have the following from your email provider:
- SMTP host (e.g.,
smtp.zoho.com) - SMTP port (typically
587for TLS or465for SSL) - SMTP password (or app-specific password)
- IMAP host (e.g.,
imap.zoho.com) - IMAP port (typically
993for SSL) - IMAP password (usually the same as SMTP, but can differ)
If your email provider uses two-factor authentication, you may need to generate an app password specifically for third-party access.
Step 1: Navigate to Custom SMTP
- Log into your ColdSend account.
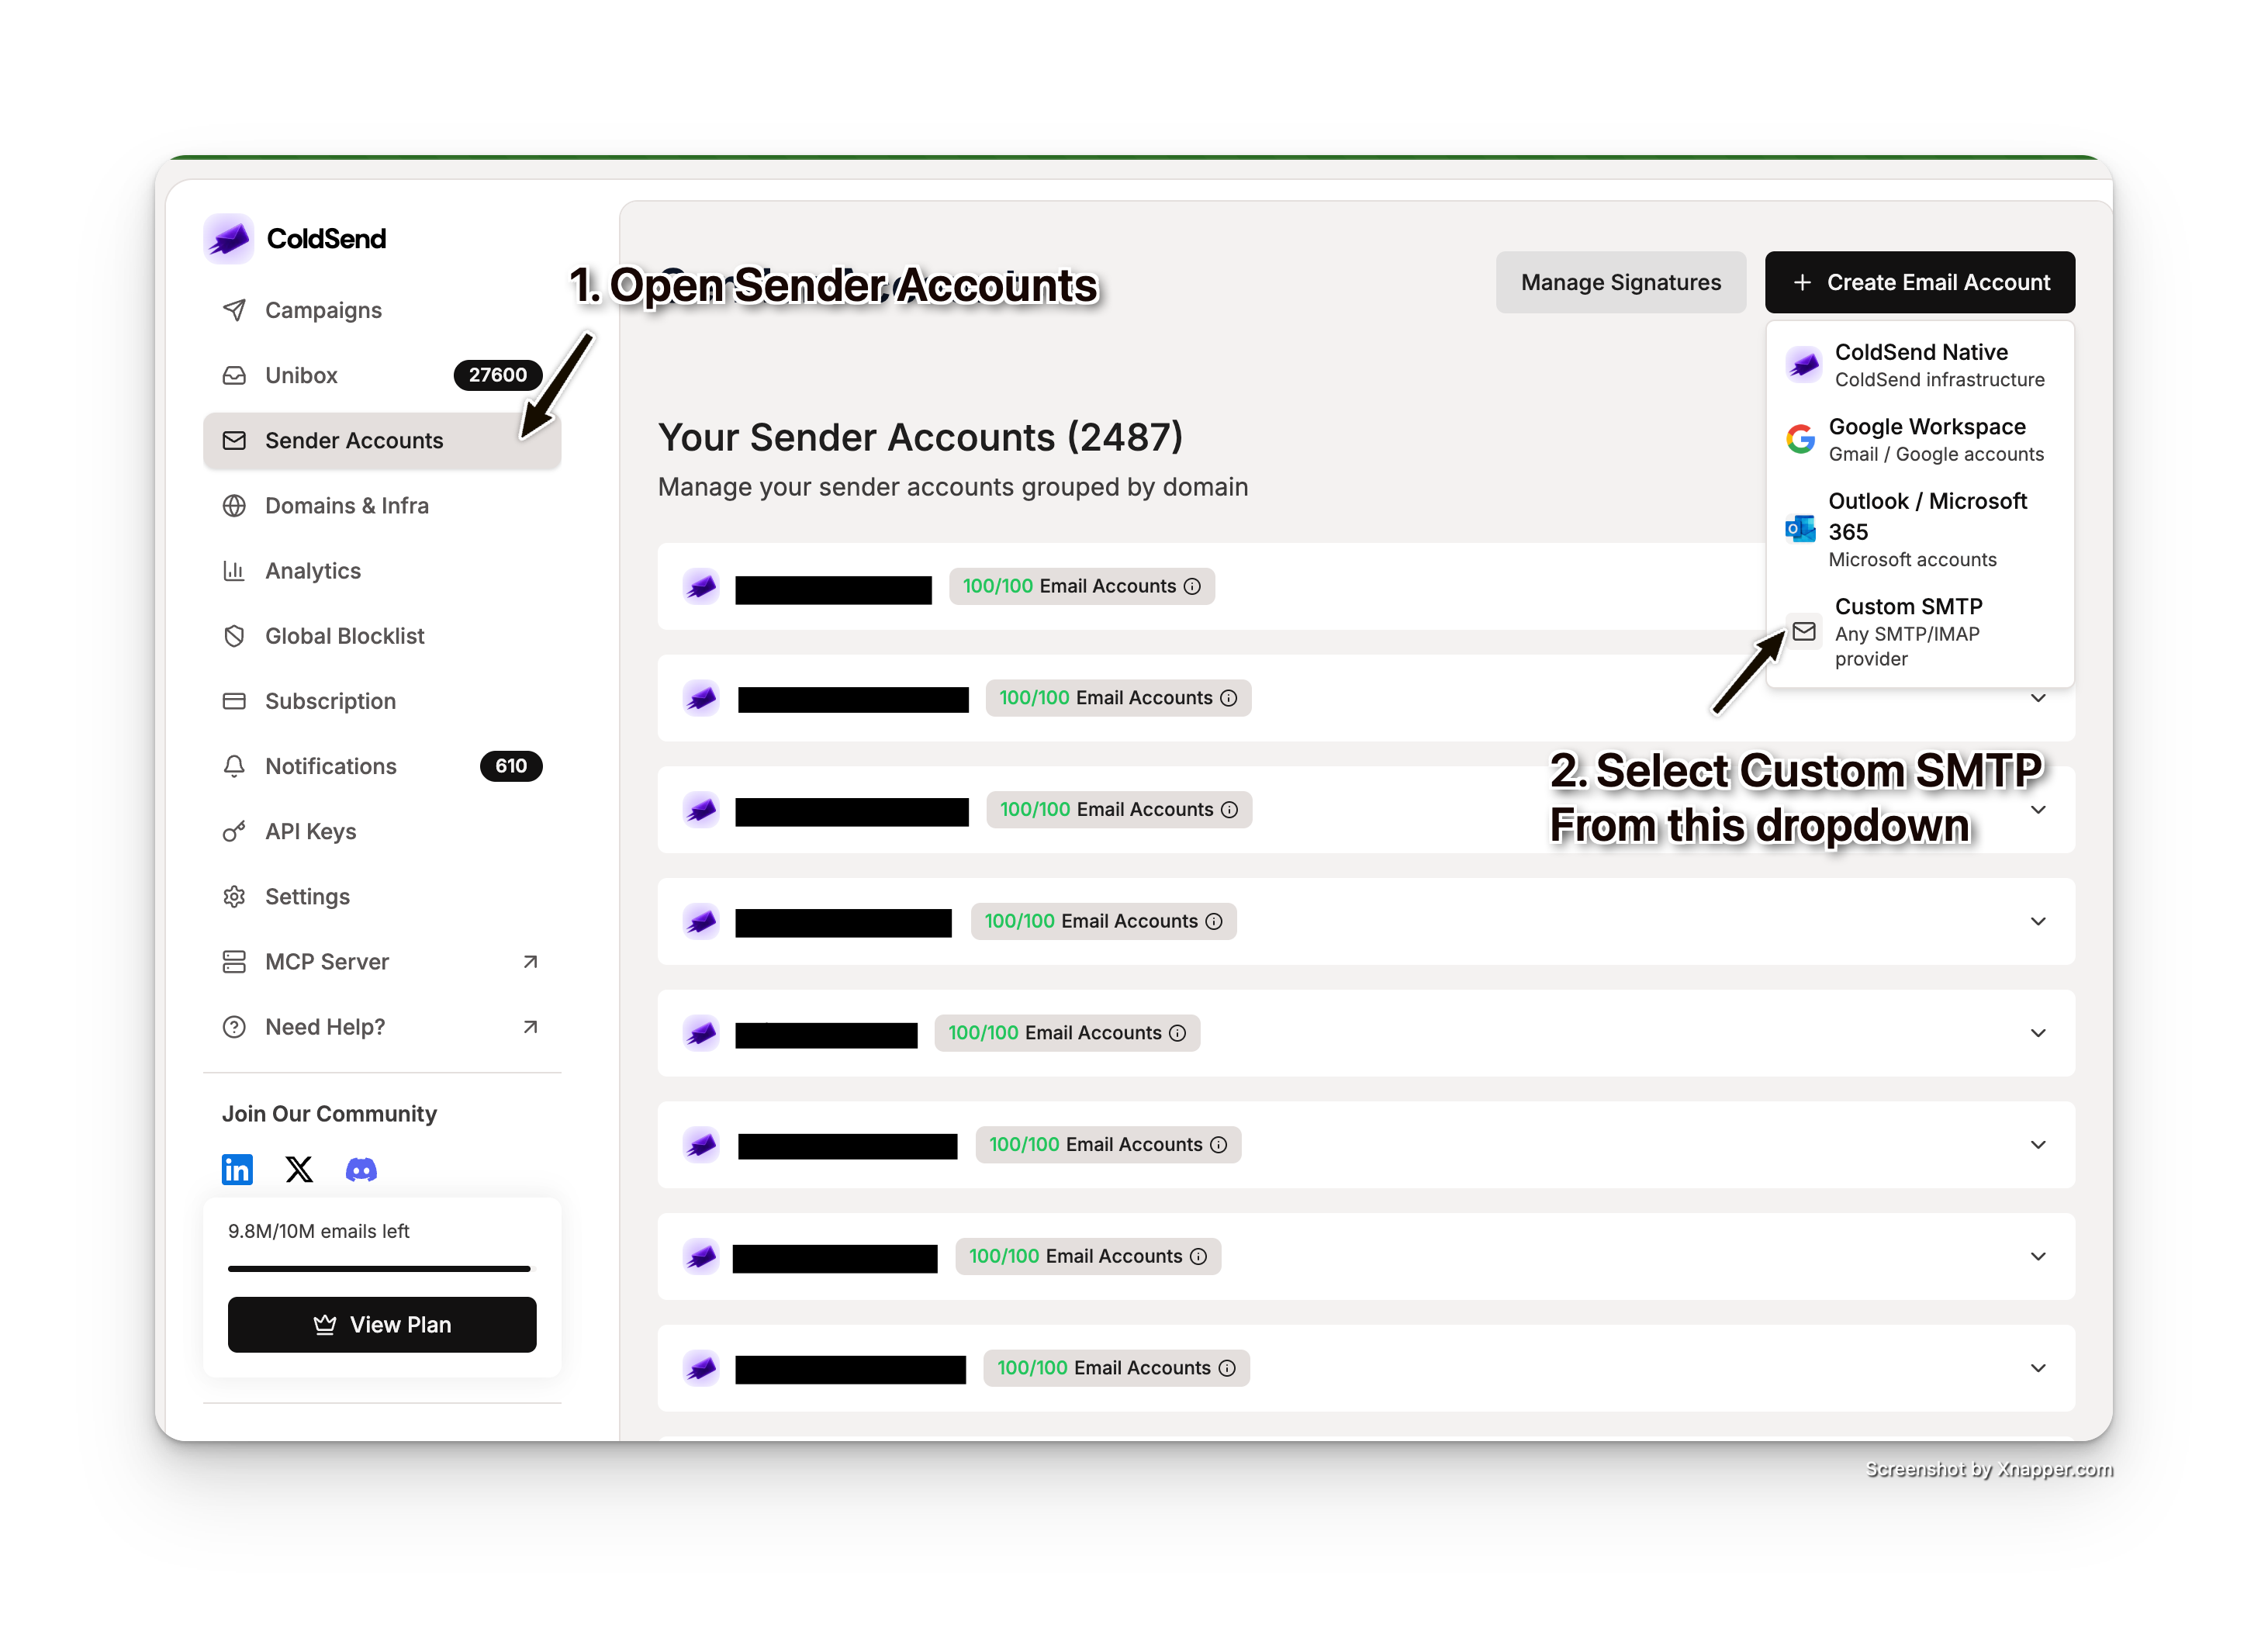
- In the left sidebar, go to Sender Accounts.
- Click the Create Email Account dropdown and choose Custom SMTP.
- You will land on the Custom SMTP page with two tabs: Single Account and Bulk Import.
Approach A: Single Account Import
Use this when you want to connect one email account at a time.
Step 2: Fill in Account Details
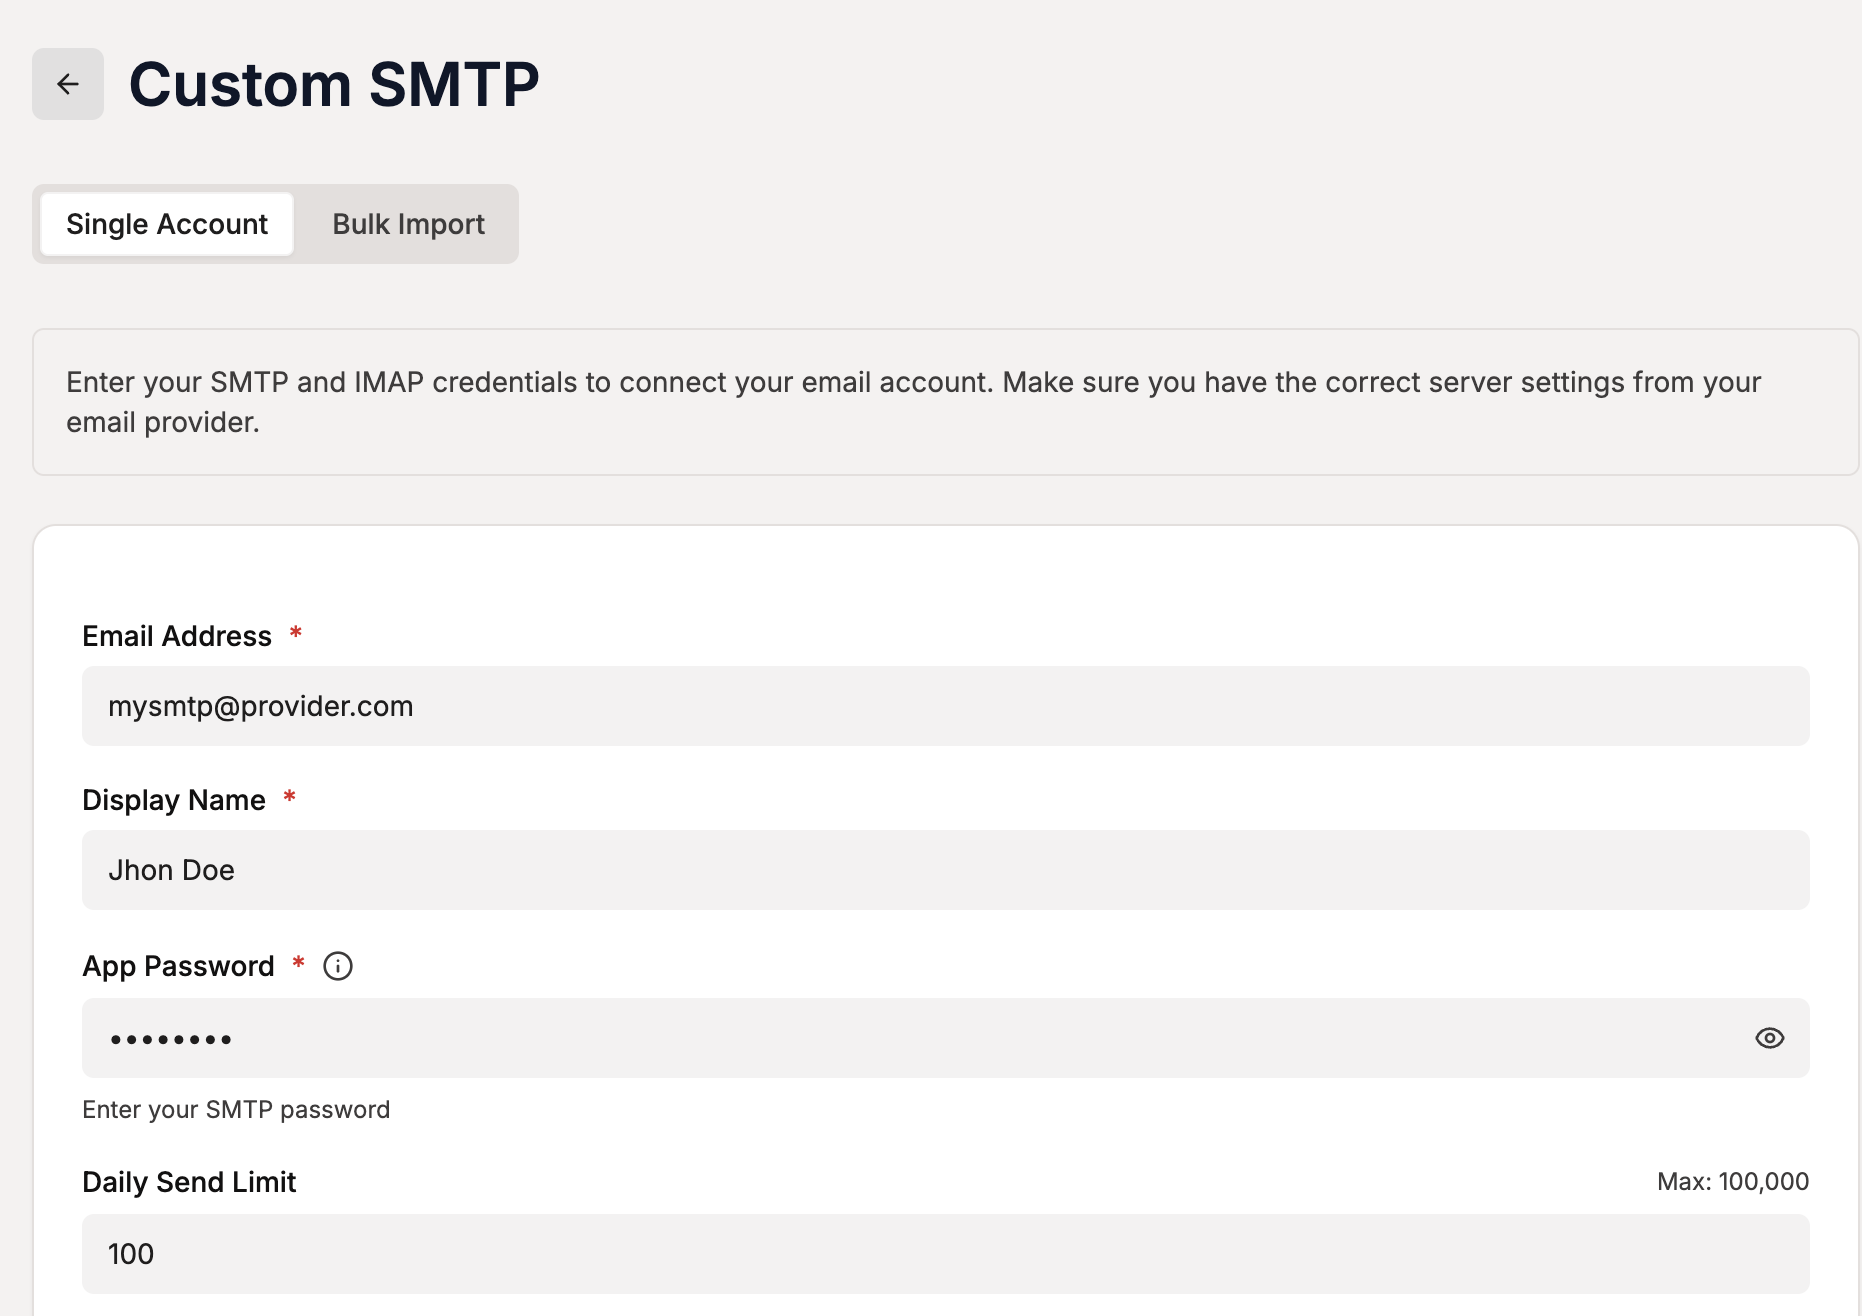
Under the Single Account tab, fill in the following fields:
| Field | Required | Description |
|---|---|---|
| Email Address | Yes | The full email address you want to connect (e.g., john@example.com) |
| Display Name | Yes | The sender name that recipients will see (e.g., John Doe) |
| App Password | Yes | Your SMTP password. Click the eye icon to toggle visibility. |
| Daily Send Limit | No | Maximum emails per day from this inbox. Default: 100, Max: 100,000. |
Step 3: Configure SMTP Settings
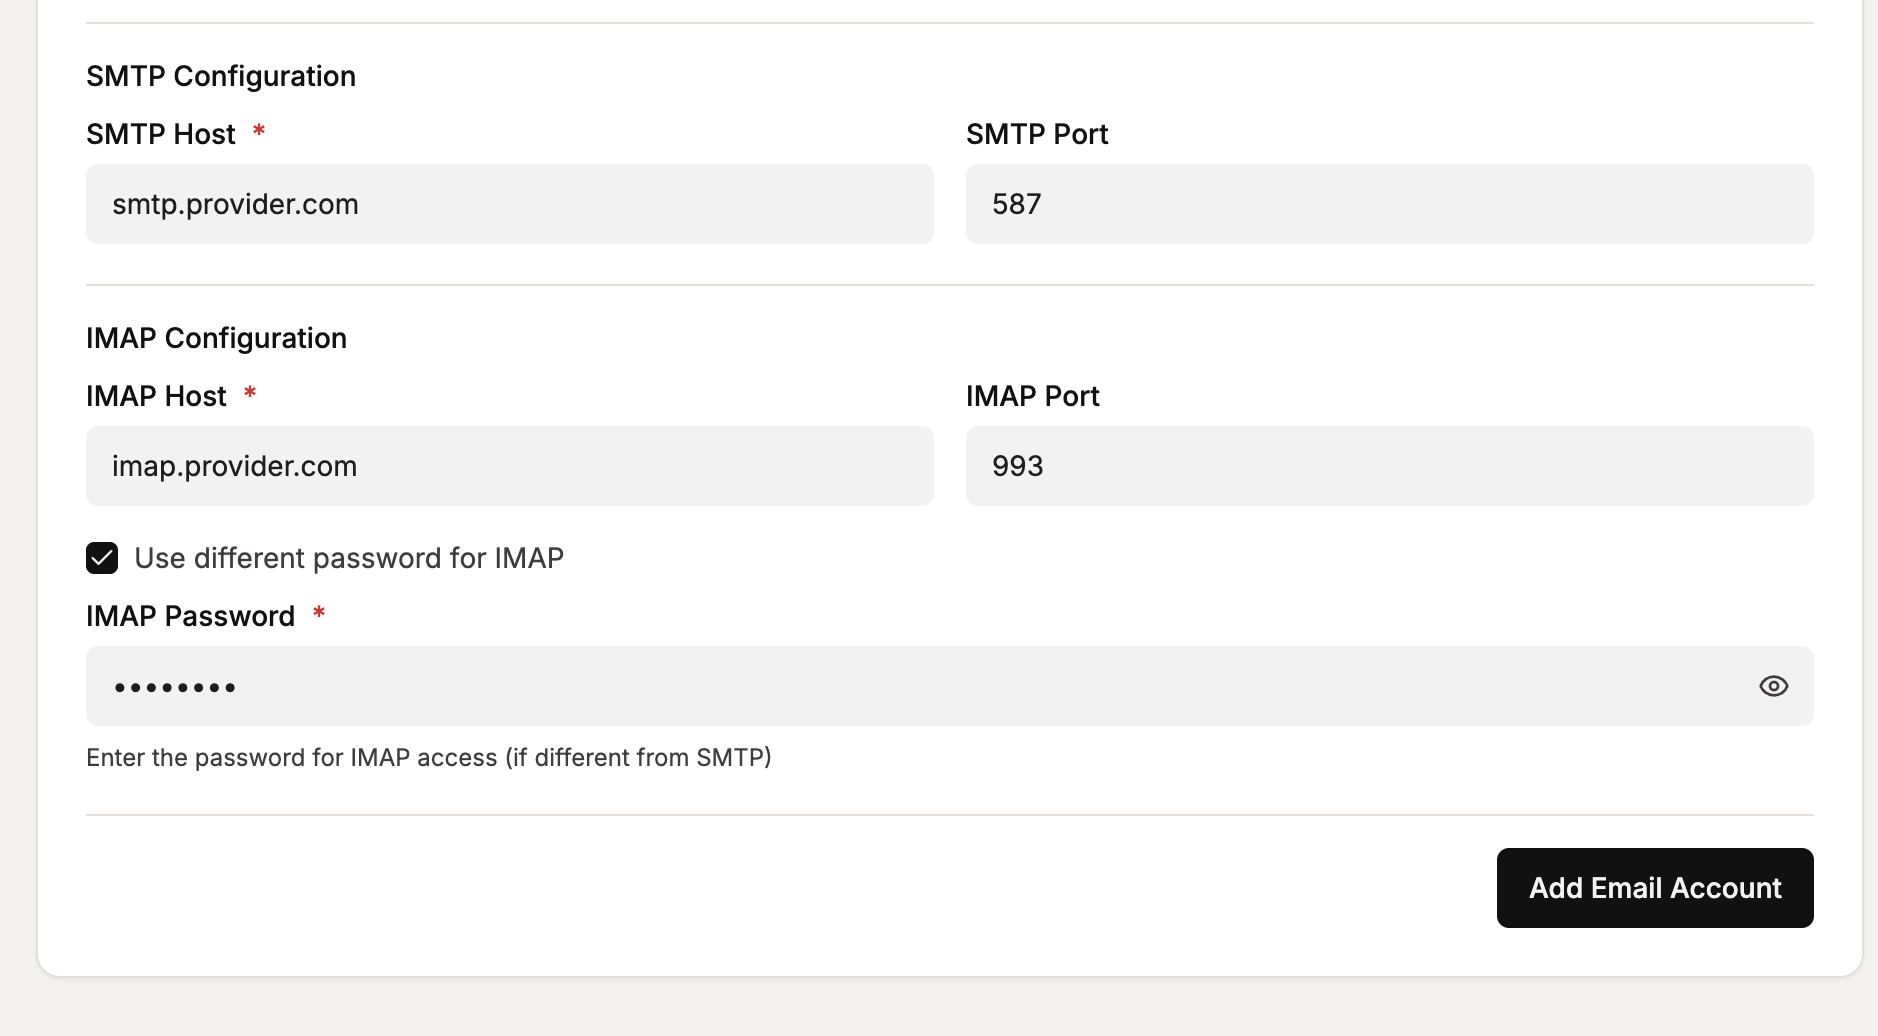
Under the SMTP Configuration section:
| Field | Required | Description |
|---|---|---|
| SMTP Host | Yes | Your SMTP server address (e.g., smtp.example.com) |
| SMTP Port | No | Defaults to 587. Use 465 for SSL connections. |
Step 4: Configure IMAP Settings
Under the IMAP Configuration section:
| Field | Required | Description |
|---|---|---|
| IMAP Host | Yes | Your IMAP server address (e.g., imap.example.com) |
| IMAP Port | No | Defaults to 993. |
Step 5 (Optional): Separate IMAP Password
If your IMAP credentials differ from your SMTP credentials, check "Use different password for IMAP". An additional password field will appear where you can enter the IMAP-specific password.
Step 6: Add and Verify
- Click Add Email Account.
- ColdSend will test your SMTP and IMAP connections.
- On success, you'll see a confirmation toast and the account will appear in the Connected Accounts section below.
- If the connection fails, you'll see an error message — double-check your credentials and server settings and try again.
Approach B: Bulk Import via CSV
Use this when you need to connect multiple SMTP accounts at once.
Step 2: Download the CSV Template
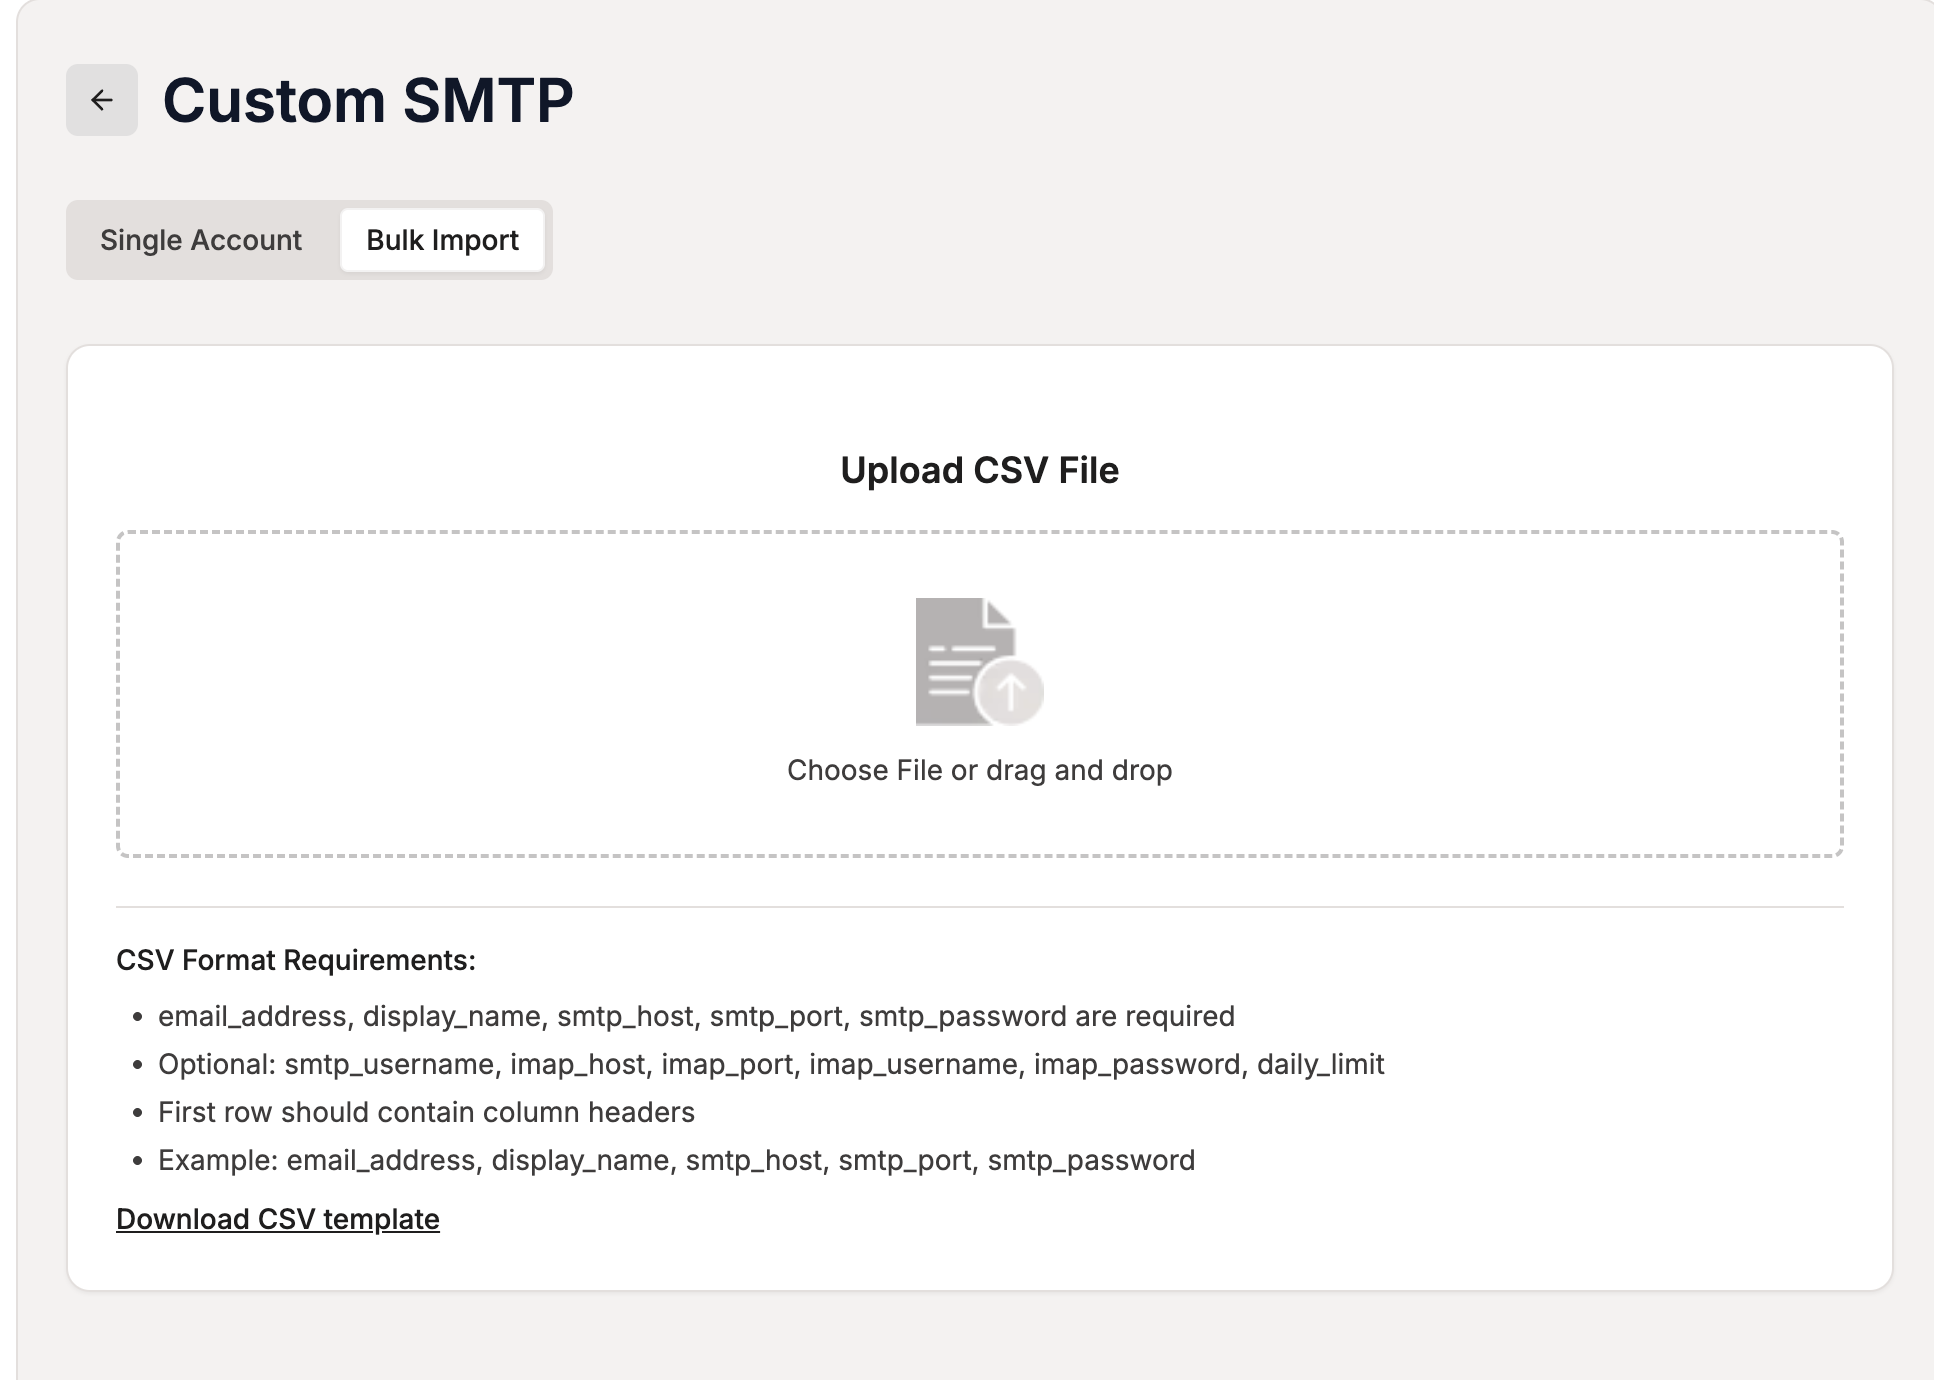
- Switch to the Bulk Import tab.
- Scroll to the bottom and click Download CSV template.
- Open the downloaded file (
smtp_inboxes_template.csv) in your preferred spreadsheet editor.
Step 3: Fill in Your CSV
Your CSV must include a header row followed by one row per email account. Here is the full list of supported columns:
| Column | Required | Default | Description |
|---|---|---|---|
email_address |
Yes | — | Full email address |
display_name |
Yes | — | Sender display name |
smtp_host |
Yes | — | SMTP server hostname |
smtp_port |
Yes | — | SMTP port (e.g., 587) |
smtp_password |
Yes | — | SMTP authentication password |
smtp_username |
No | Same as email_address |
SMTP login username |
smtp_use_tls |
No | true |
Use TLS for SMTP (true/false) |
imap_host |
No | SMTP host with smtp replaced by imap |
IMAP server hostname |
imap_port |
No | 993 |
IMAP port |
imap_username |
No | Same as email_address |
IMAP login username |
imap_password |
No | Same as smtp_password |
IMAP authentication password |
imap_use_ssl |
No | true |
Use SSL for IMAP (true/false) |
daily_limit |
No | 100 |
Daily send limit per inbox |
Example CSV:
email_address,display_name,smtp_host,smtp_port,smtp_password,imap_host,imap_port,imap_password,daily_limit
john@example.com,John Doe,smtp.example.com,587,smtppass123,imap.example.com,993,imappass123,100
jane@company.com,Jane Smith,mail.company.com,587,pass456,mail.company.com,993,pass456,50
info@startup.io,Info Team,smtp.startup.io,465,startuppass,imap.startup.io,993,startuppass,200
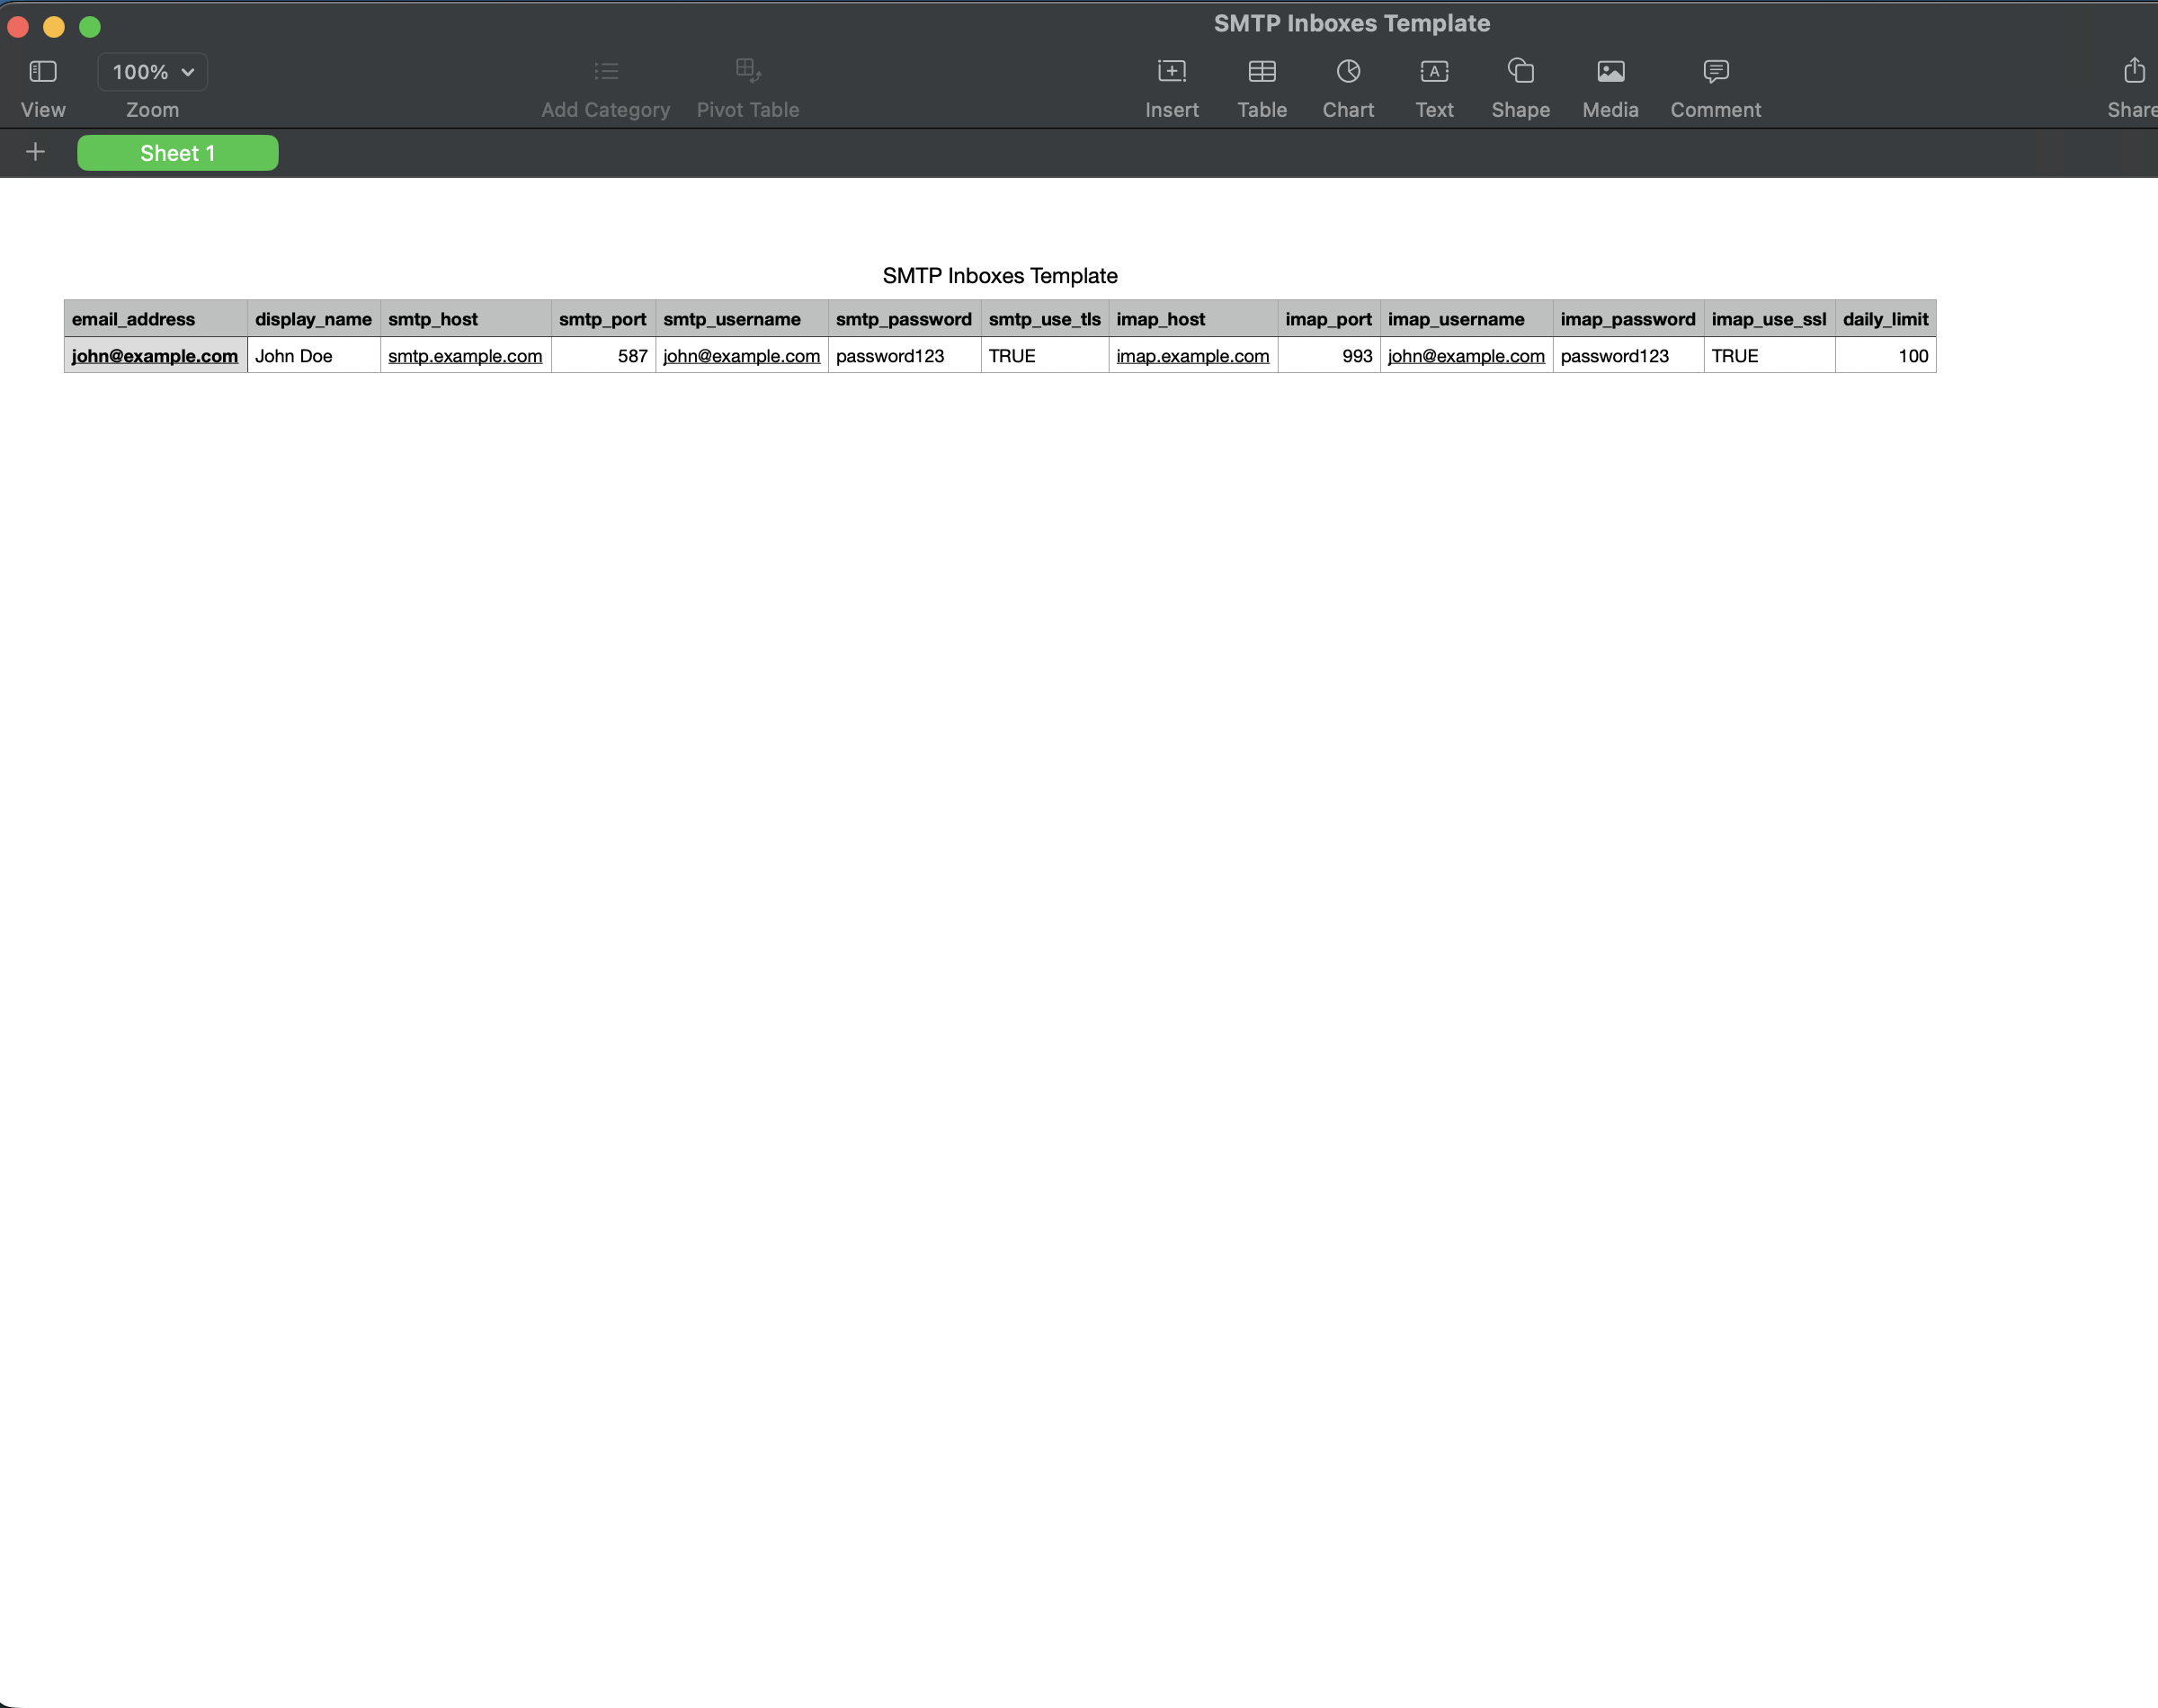
Tip: Only
email_address,display_name,smtp_host,smtp_port, andsmtp_passwordare strictly required. All other columns have sensible defaults.
Step 4: Upload Your CSV
- Click the upload area or drag and drop your CSV file onto it.
- ColdSend will parse the file and display:
- Valid Rows — accounts that passed format validation
- Errors — rows with issues (e.g., missing fields, column mismatches)
- A preview of the first 5 accounts is shown so you can verify the data looks correct.
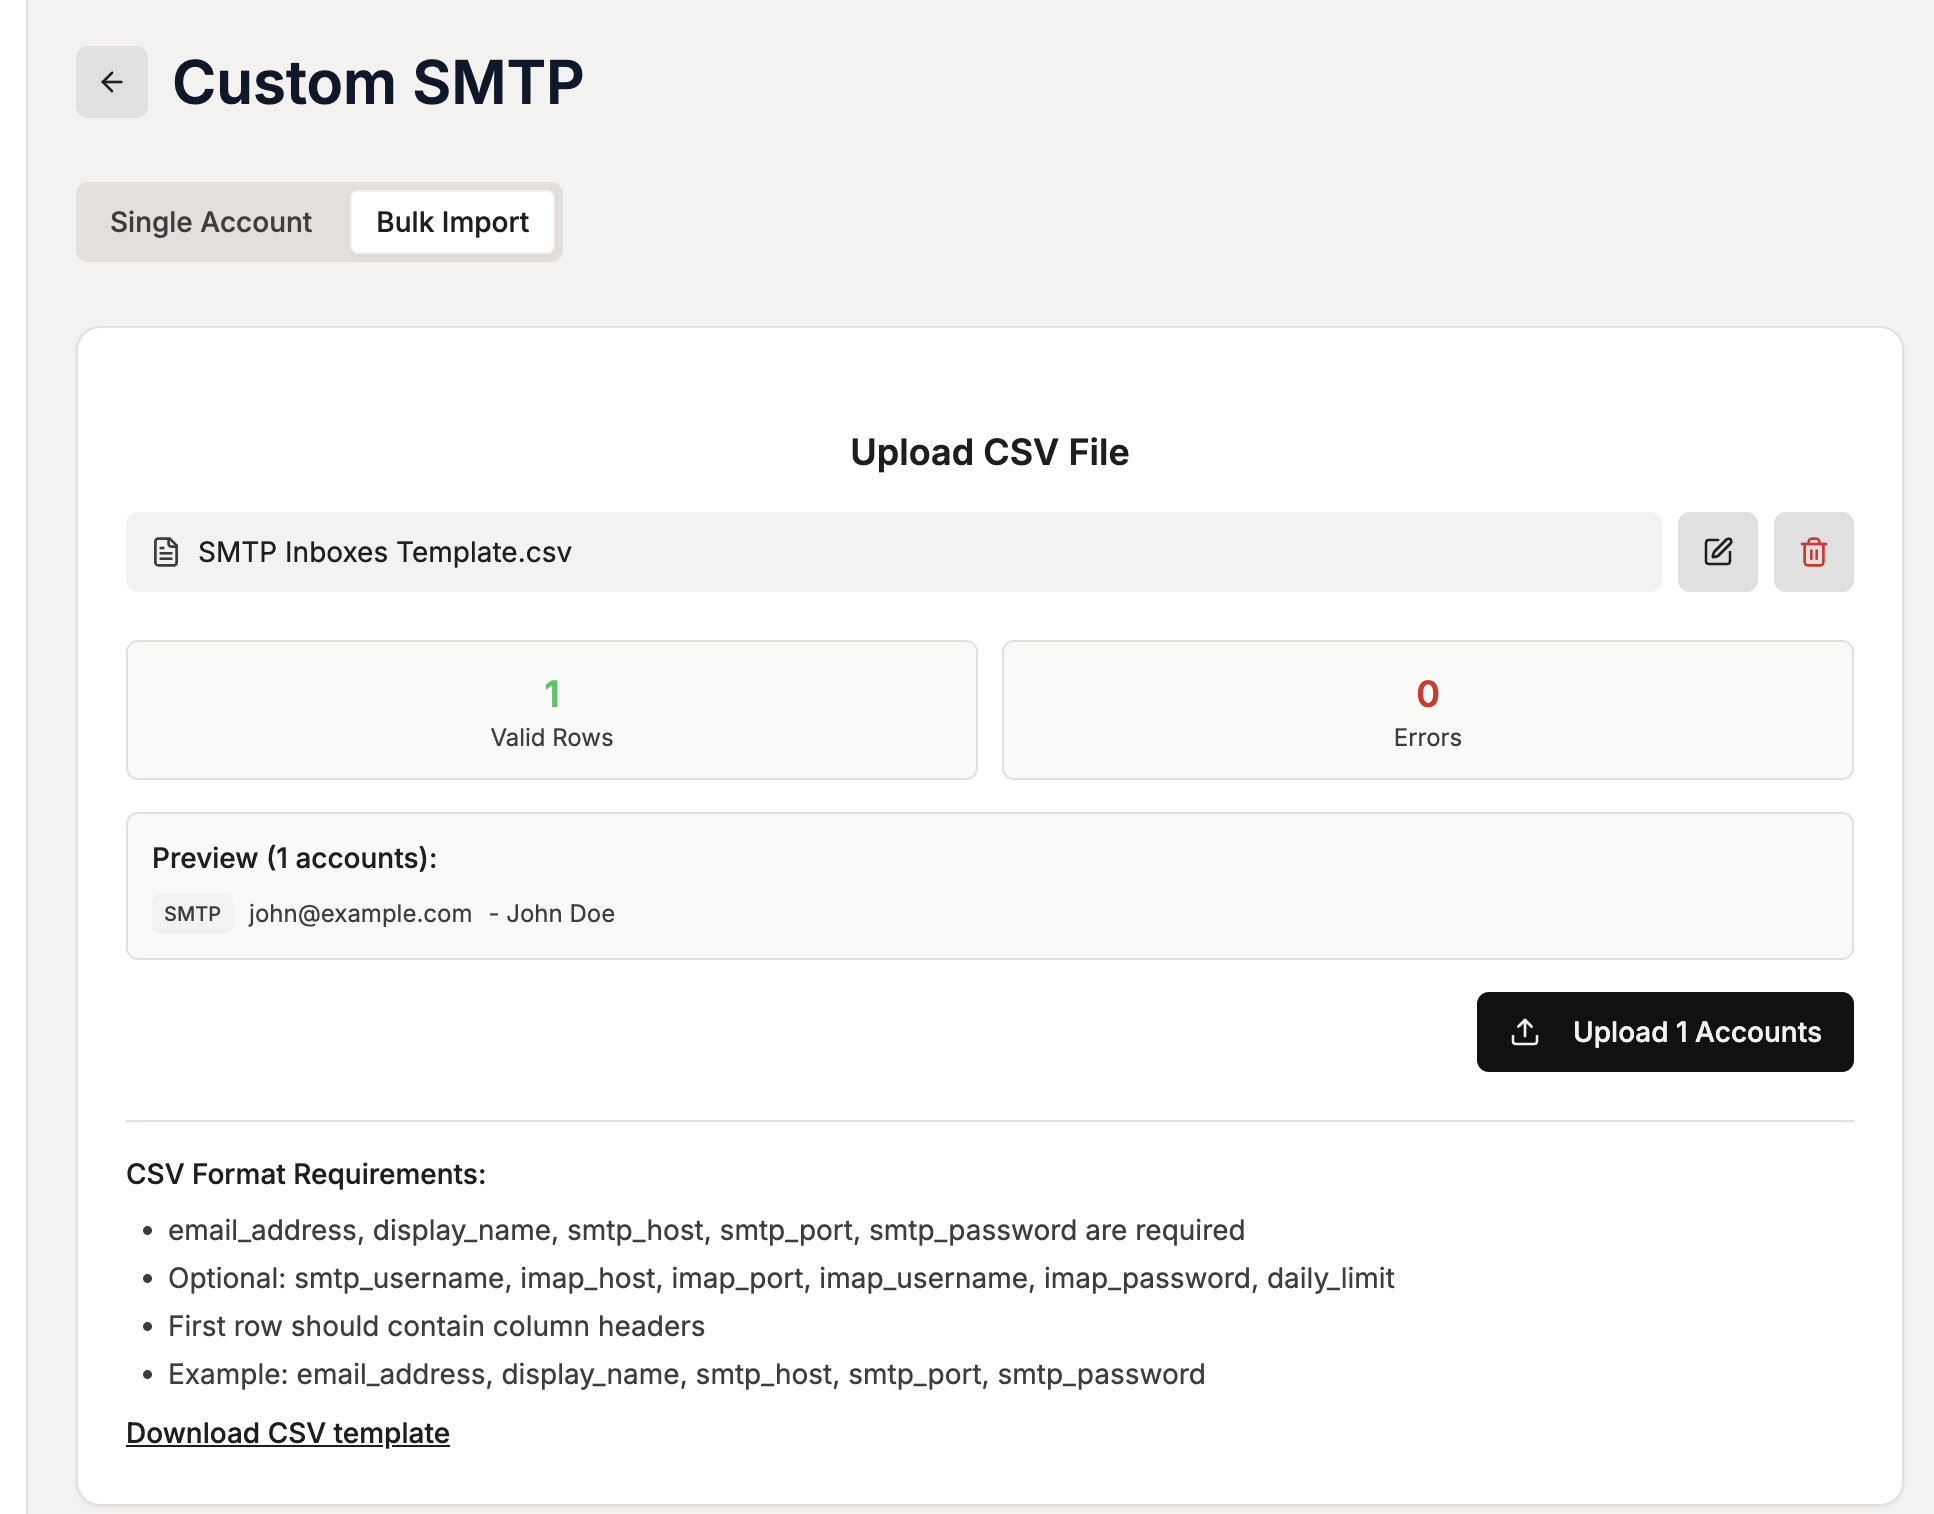
Step 5: Submit and Monitor Progress
- Click Upload N Accounts to start the import.
- ColdSend will test the SMTP and IMAP connection for each account in the background.
- A progress tracker appears showing real-time status for every account:
- Testing — connection is being verified
- Valid — SMTP and IMAP both passed, account is connected
- SMTP Failed — SMTP connection failed
- IMAP Failed — IMAP connection failed
- Both Failed — neither SMTP nor IMAP could connect
- Skipped — account was skipped due to a processing error
Handling Failed Accounts
If some accounts fail validation, you'll see the specific error (SMTP or IMAP failure) for each one in the progress tracker. To fix them:
- Correct the credentials in your CSV (wrong password, incorrect host, etc.).
- Create a new CSV with only the failed accounts.
- Re-upload using the same Bulk Import flow.
Connected Accounts
After adding accounts (single or bulk), they appear in the Connected Accounts section at the bottom of the page. Each account shows:
- Email address and display name
- Status badge —
ACTIVEfor successfully connected accounts, or other statuses for pending/failed ones
If you have more than 5 accounts, click "View all N accounts" to see the full list on the main Email Accounts page.
FAQs
What email providers work with Custom SMTP?
Any provider that supports SMTP for sending and IMAP for receiving. Common examples include Zoho, Namecheap, cPanel/WHM, Fastmail, Postmark (SMTP only), Amazon SES (SMTP only), and self-hosted mail servers.
Does ColdSend store my SMTP password?
Your credentials are securely stored encrypted to enable ongoing email sending and IMAP monitoring. They are never exposed in the UI.
What happens if I set the daily limit too high?
ColdSend enforces the daily limit you set, but your email provider may have its own sending limits. Exceeding your provider's limits may result in rejected emails or account suspension. Check your provider's documentation.
Can I use the same password for SMTP and IMAP?
Yes. By default, ColdSend uses the same password for both. Only check "Use different password for IMAP" if your provider requires separate credentials.
Can I edit SMTP/IMAP settings after connecting?
If you need to update credentials (e.g., after a password change), you can remove the account and re-add it with the updated settings.
My SMTP test failed — what should I check?
- Verify the SMTP host and port match your provider's documentation
- Ensure your password is correct (use an app password if 2FA is enabled)
- Check that TLS/SSL settings match your provider's requirements
- Confirm your provider allows SMTP access from third-party applications
 1 min read
 Apr 23, 2026