
Export ColdSend Native Inboxes Guide
ColdSend lets you use your native inboxes outside the platform — whether you need a quick CSV backup of credentials or want to connect individual inboxes to external sequencers via SMTP.
There are two ways to export:
- Bulk Export (CSV) — Download credentials for multiple inboxes at once
- SMTP Export — Generate relay credentials for an inbox to use in an external sequencer
Method 1: Bulk Export to CSV
Use this when you want to download a spreadsheet of inbox credentials (email, password, SMTP/IMAP settings) for multiple inboxes at once.
Step 1: Go to Sender Accounts
- In the left sidebar, click Sender Accounts
- You’ll see your inboxes grouped by domain
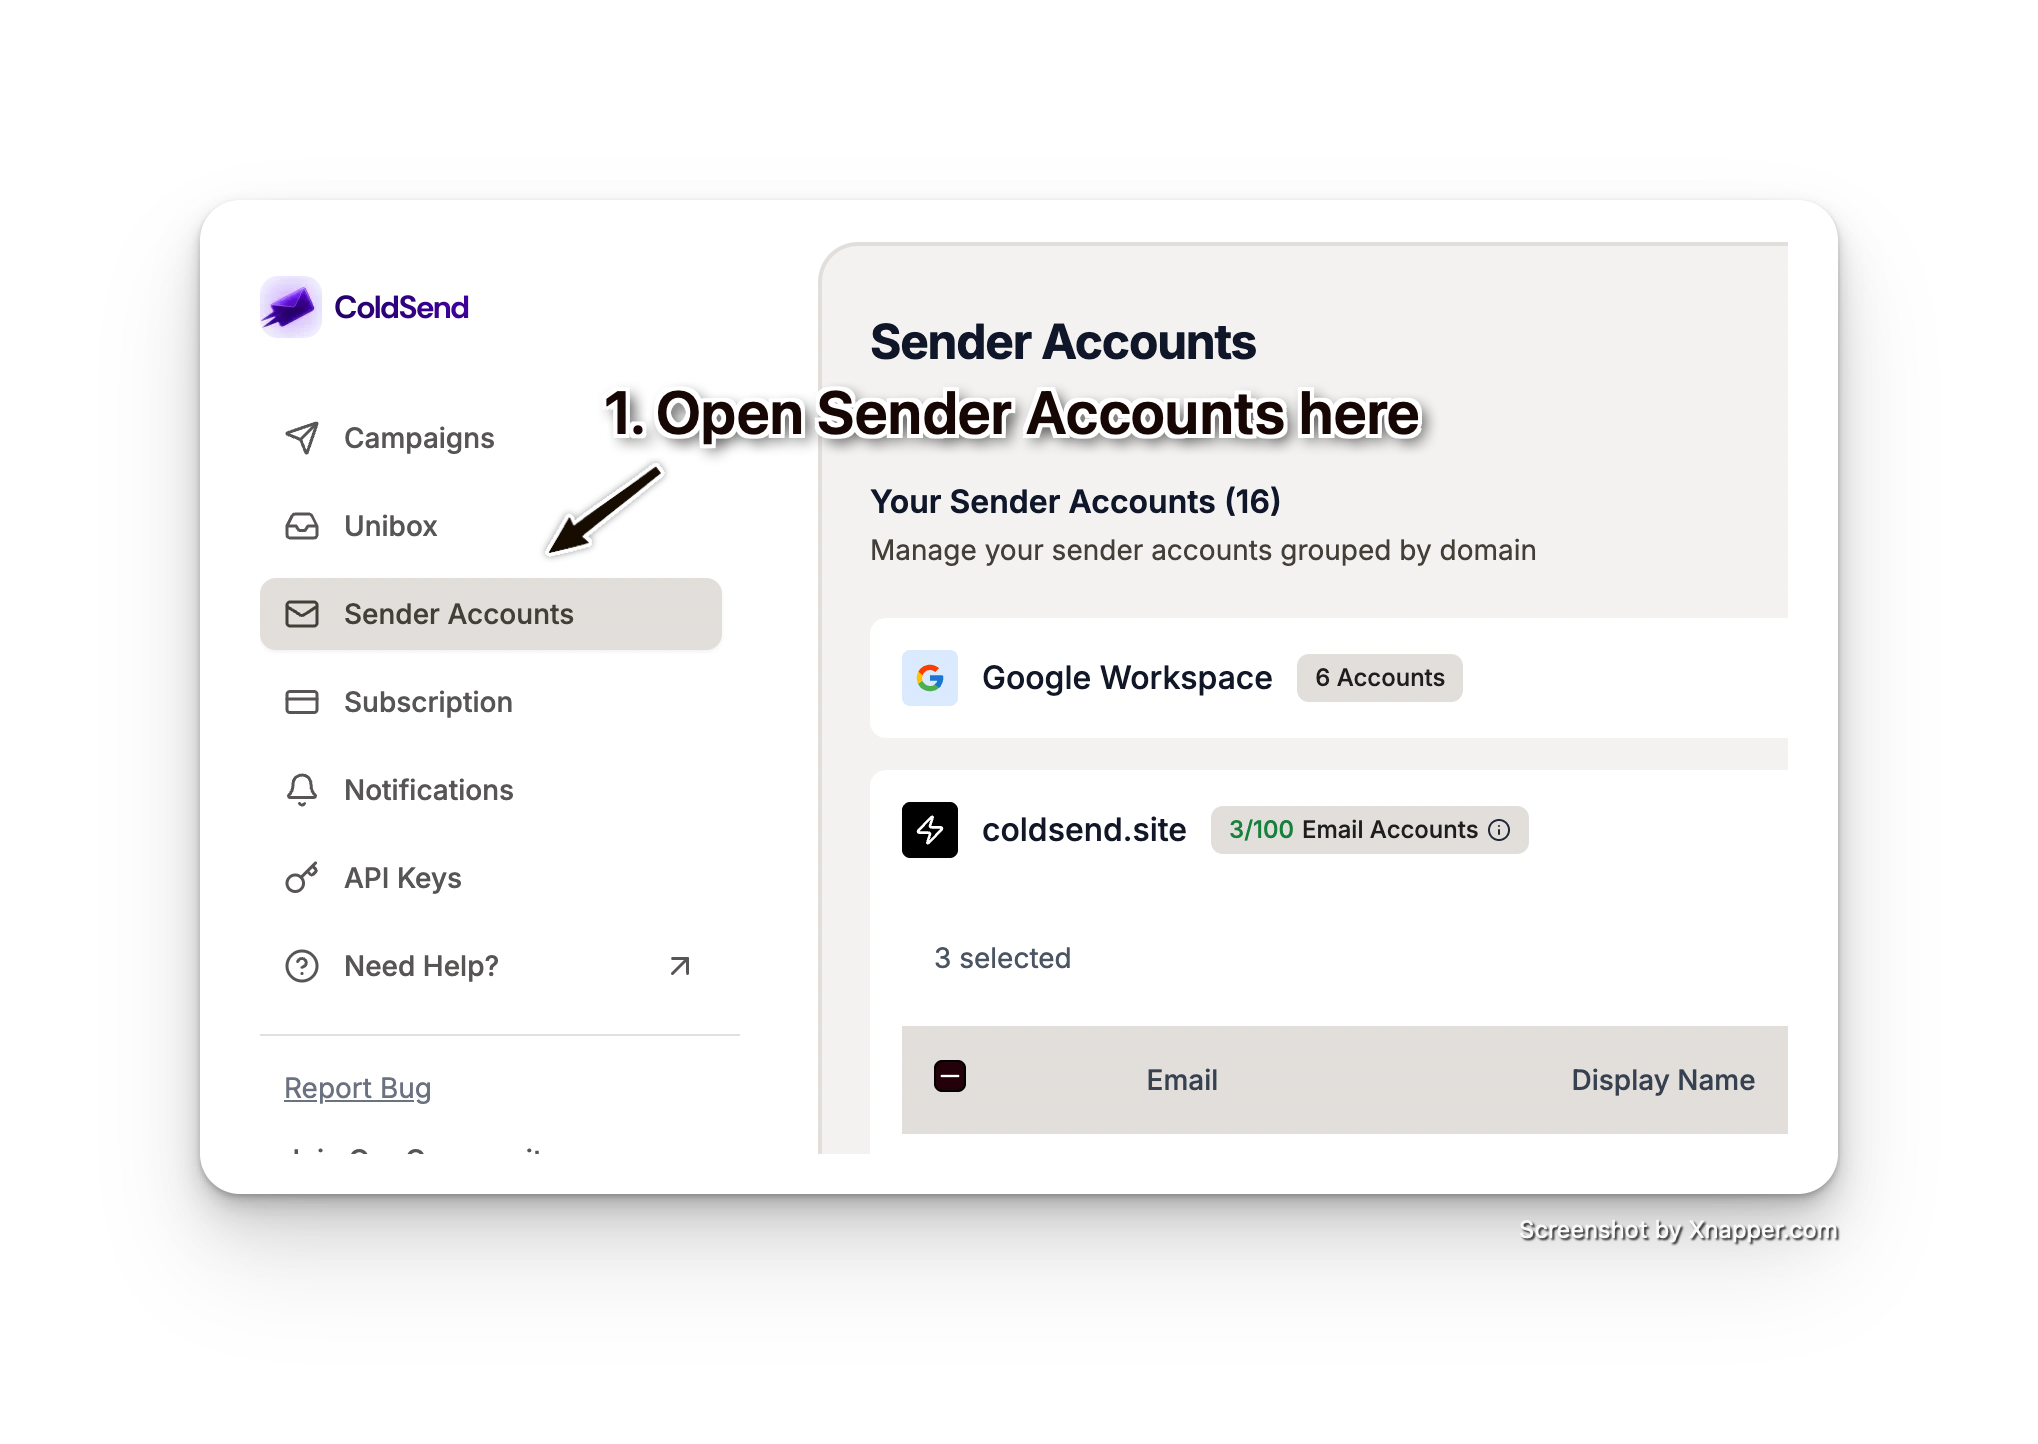 image.png
Step 2: Select Inboxes
- Expand the domain group you want to export from
- Use the checkboxes to select individual inboxes, or use the checkbox in the table header to select all on the current page
Step 3: Export
- Click the Actions button (it becomes active once you’ve selected at least one inbox)
- Click Export
- A CSV file will download automatically
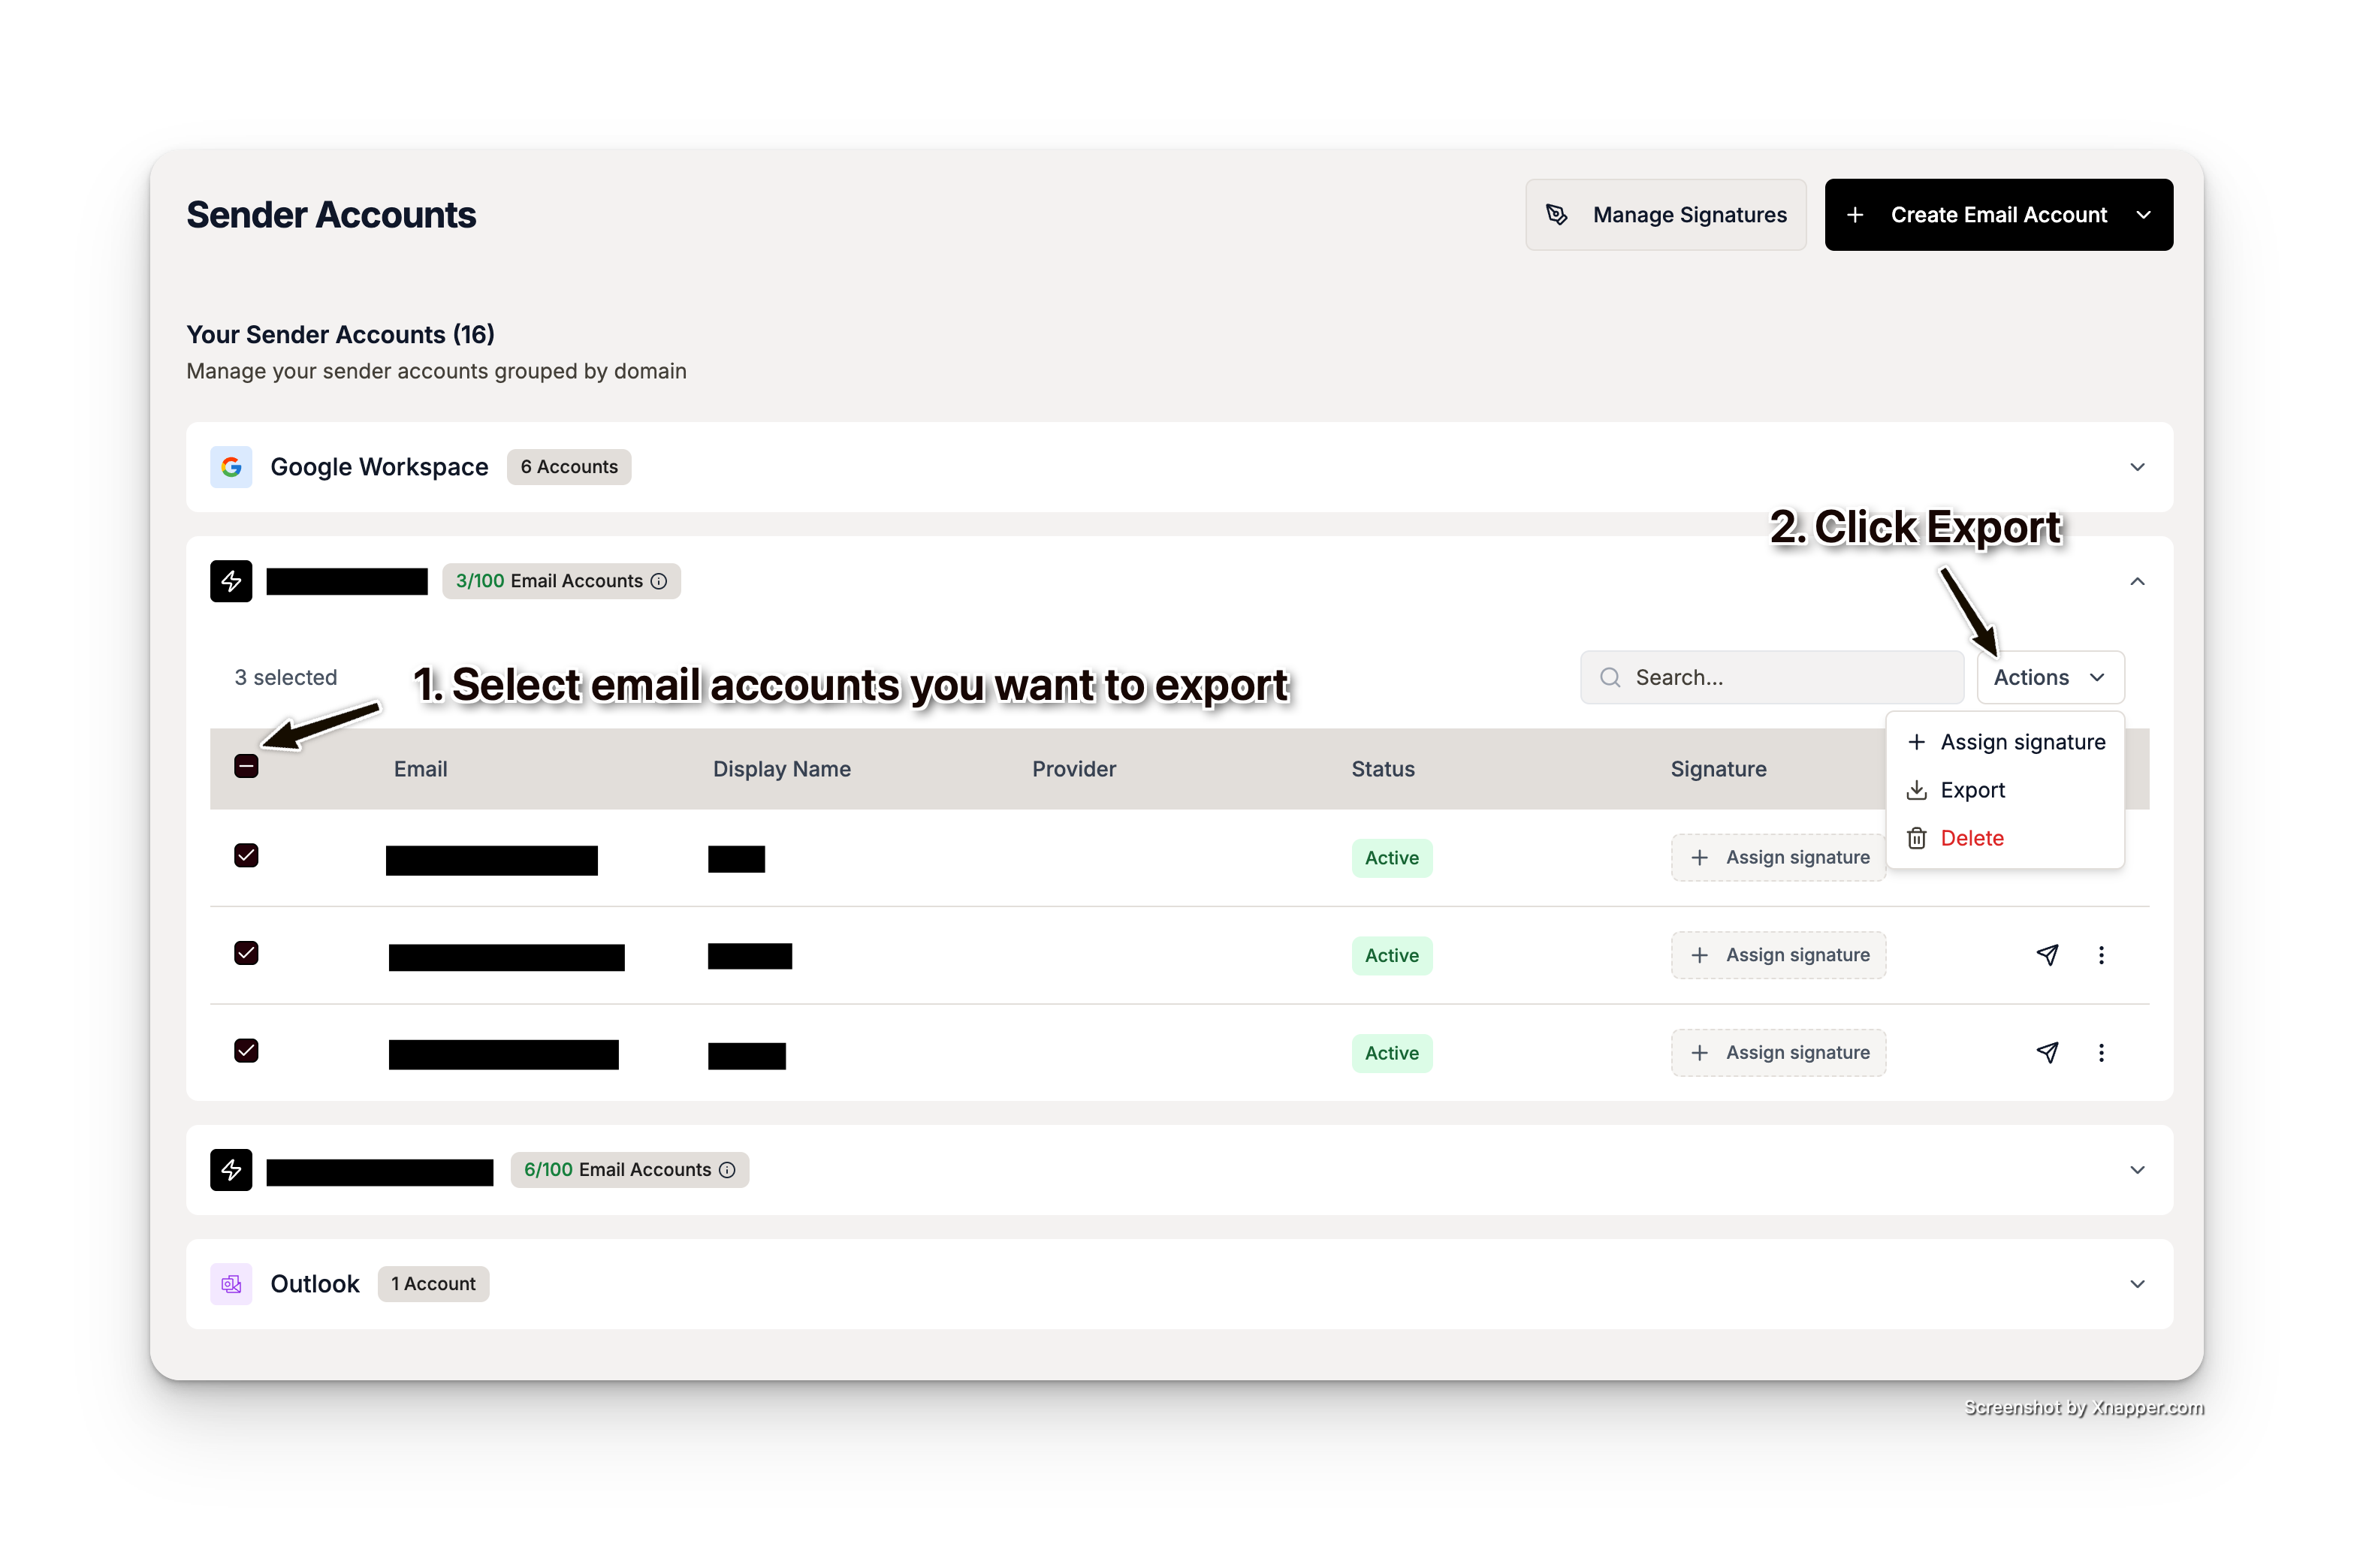 image.png
What’s in the CSV?
Tip: This CSV is ready to import into most sequencers that accept bulk SMTP account uploads.
Method 2: SMTP Export (Per-Inbox Relay Credentials)
Use this when you want to connect a specific ColdSend inbox to an external sequencer like Instantly, Smartlead, or any SMTP-compatible tool. This generates separate relay credentials — your original mailbox password is never shared.
Prerequisites
- The inbox must be a ColdSend native inbox (not Google Workspace, Outlook, or Custom SMTP)
- The inbox must have an Active status
Step 1: Enable SMTP Export
- Go to Email Accounts
- Find the inbox you want to export
- Click the three-dot menu (⋮) on the right side of the inbox row
- Click Enable SMTP Export
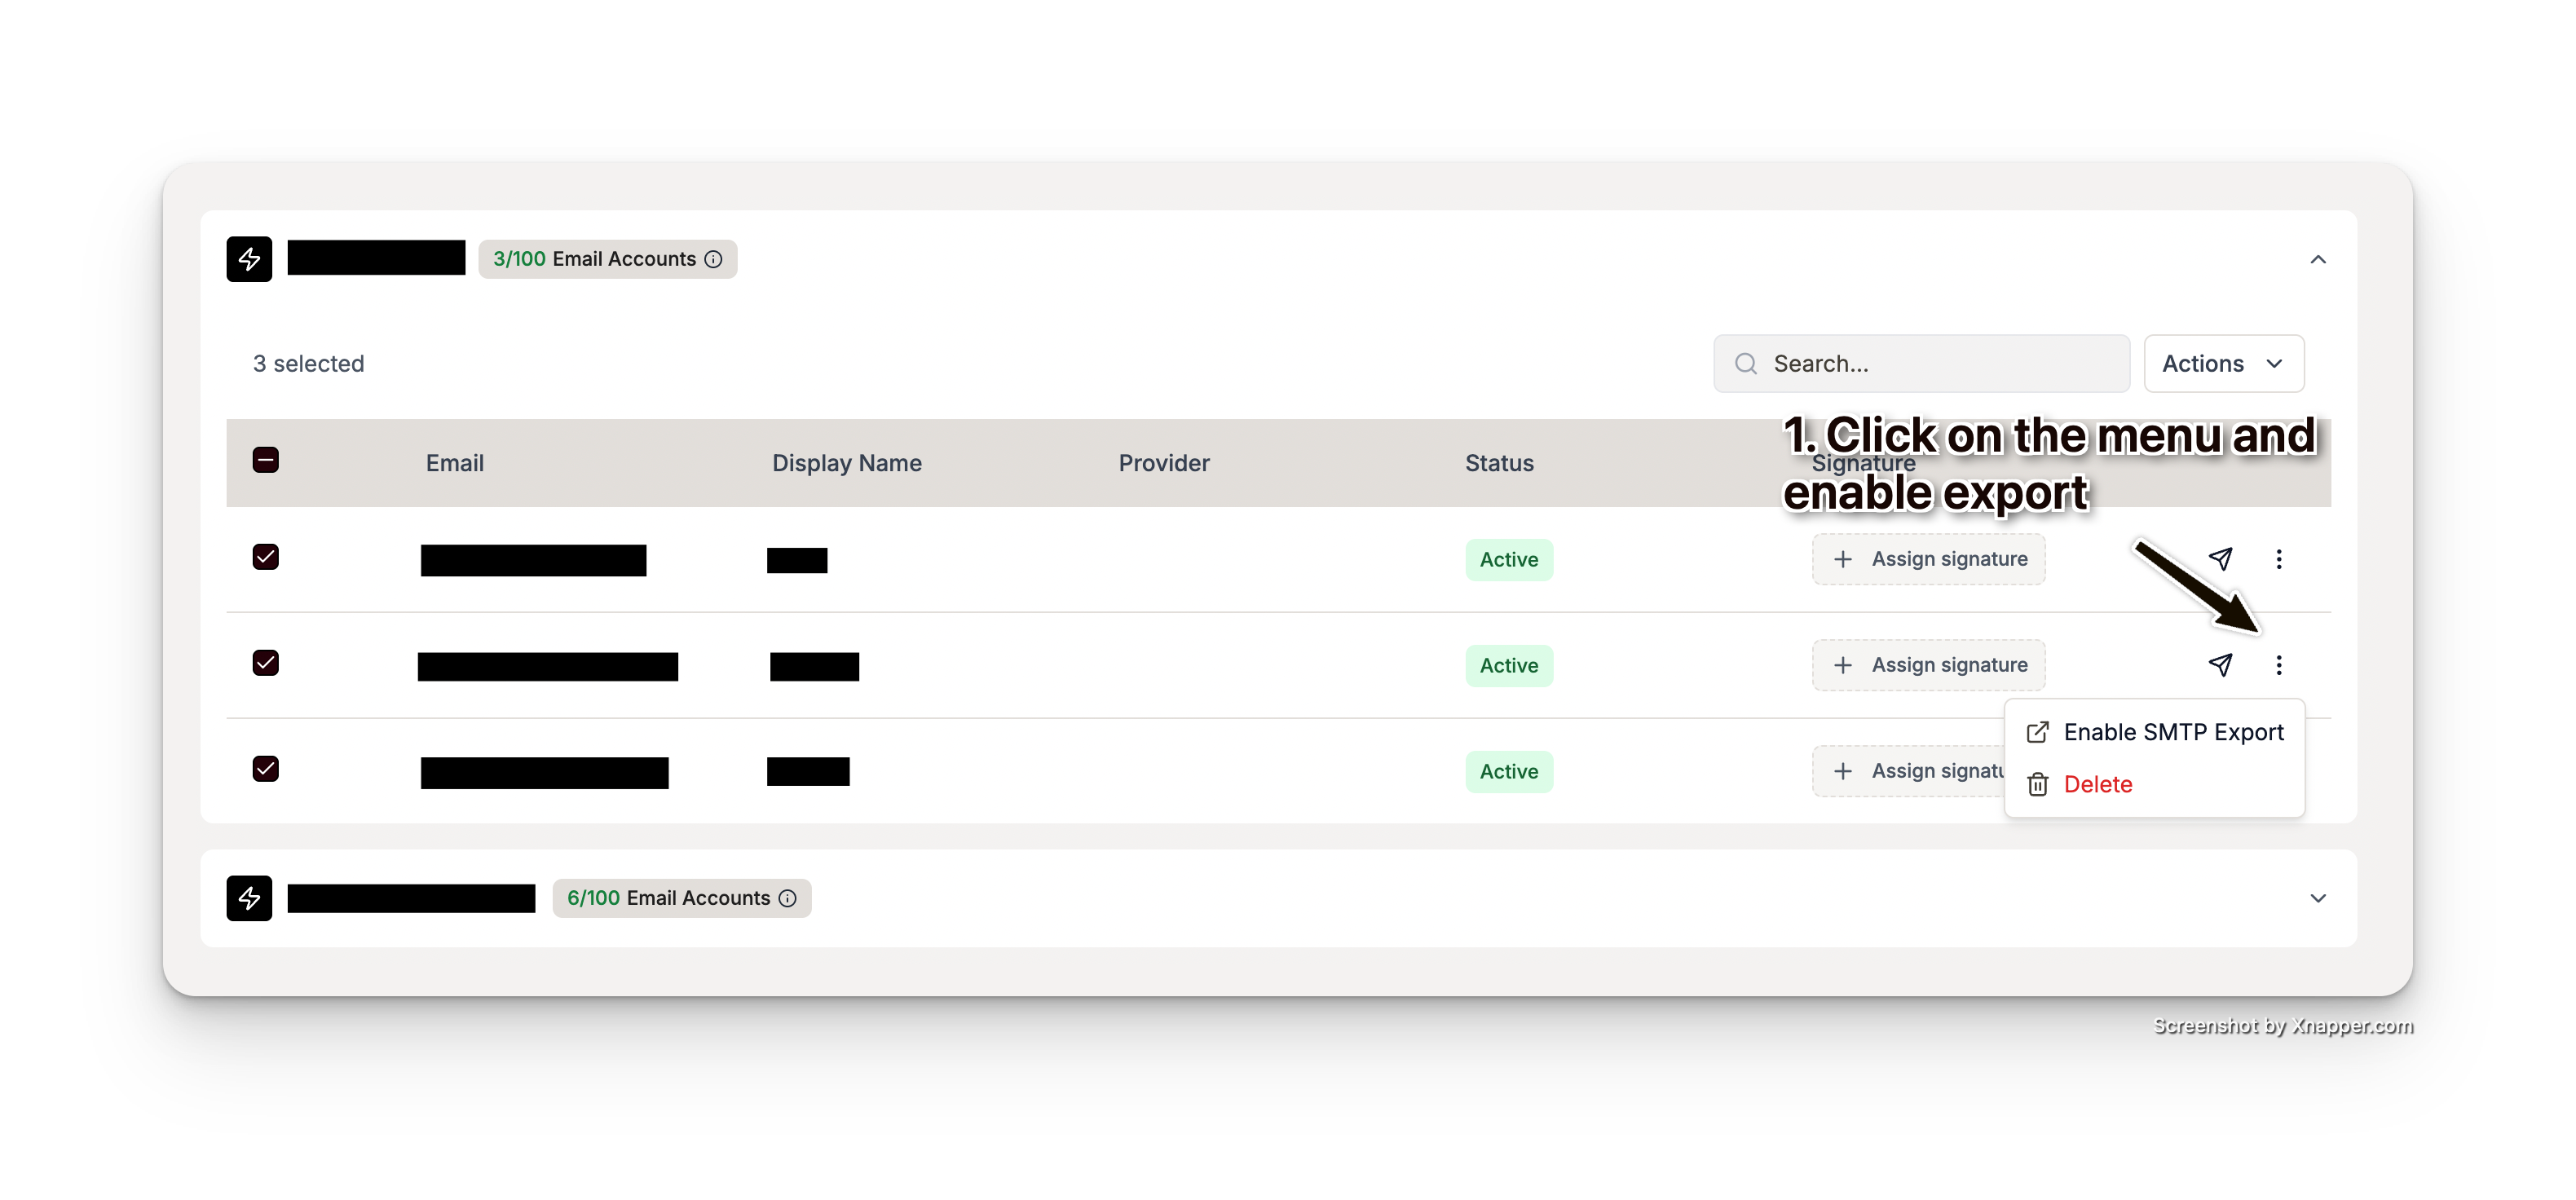 image.png
Step 2: Save Your Credentials
After enabling, you’ll see a dialog with your SMTP credentials:
⚠️ Important: Save the password immediately — it is shown only once and cannot be retrieved later. If you lose it, you’ll need to regenerate a new one.
Use the copy buttons next to each field to copy values to your clipboard.
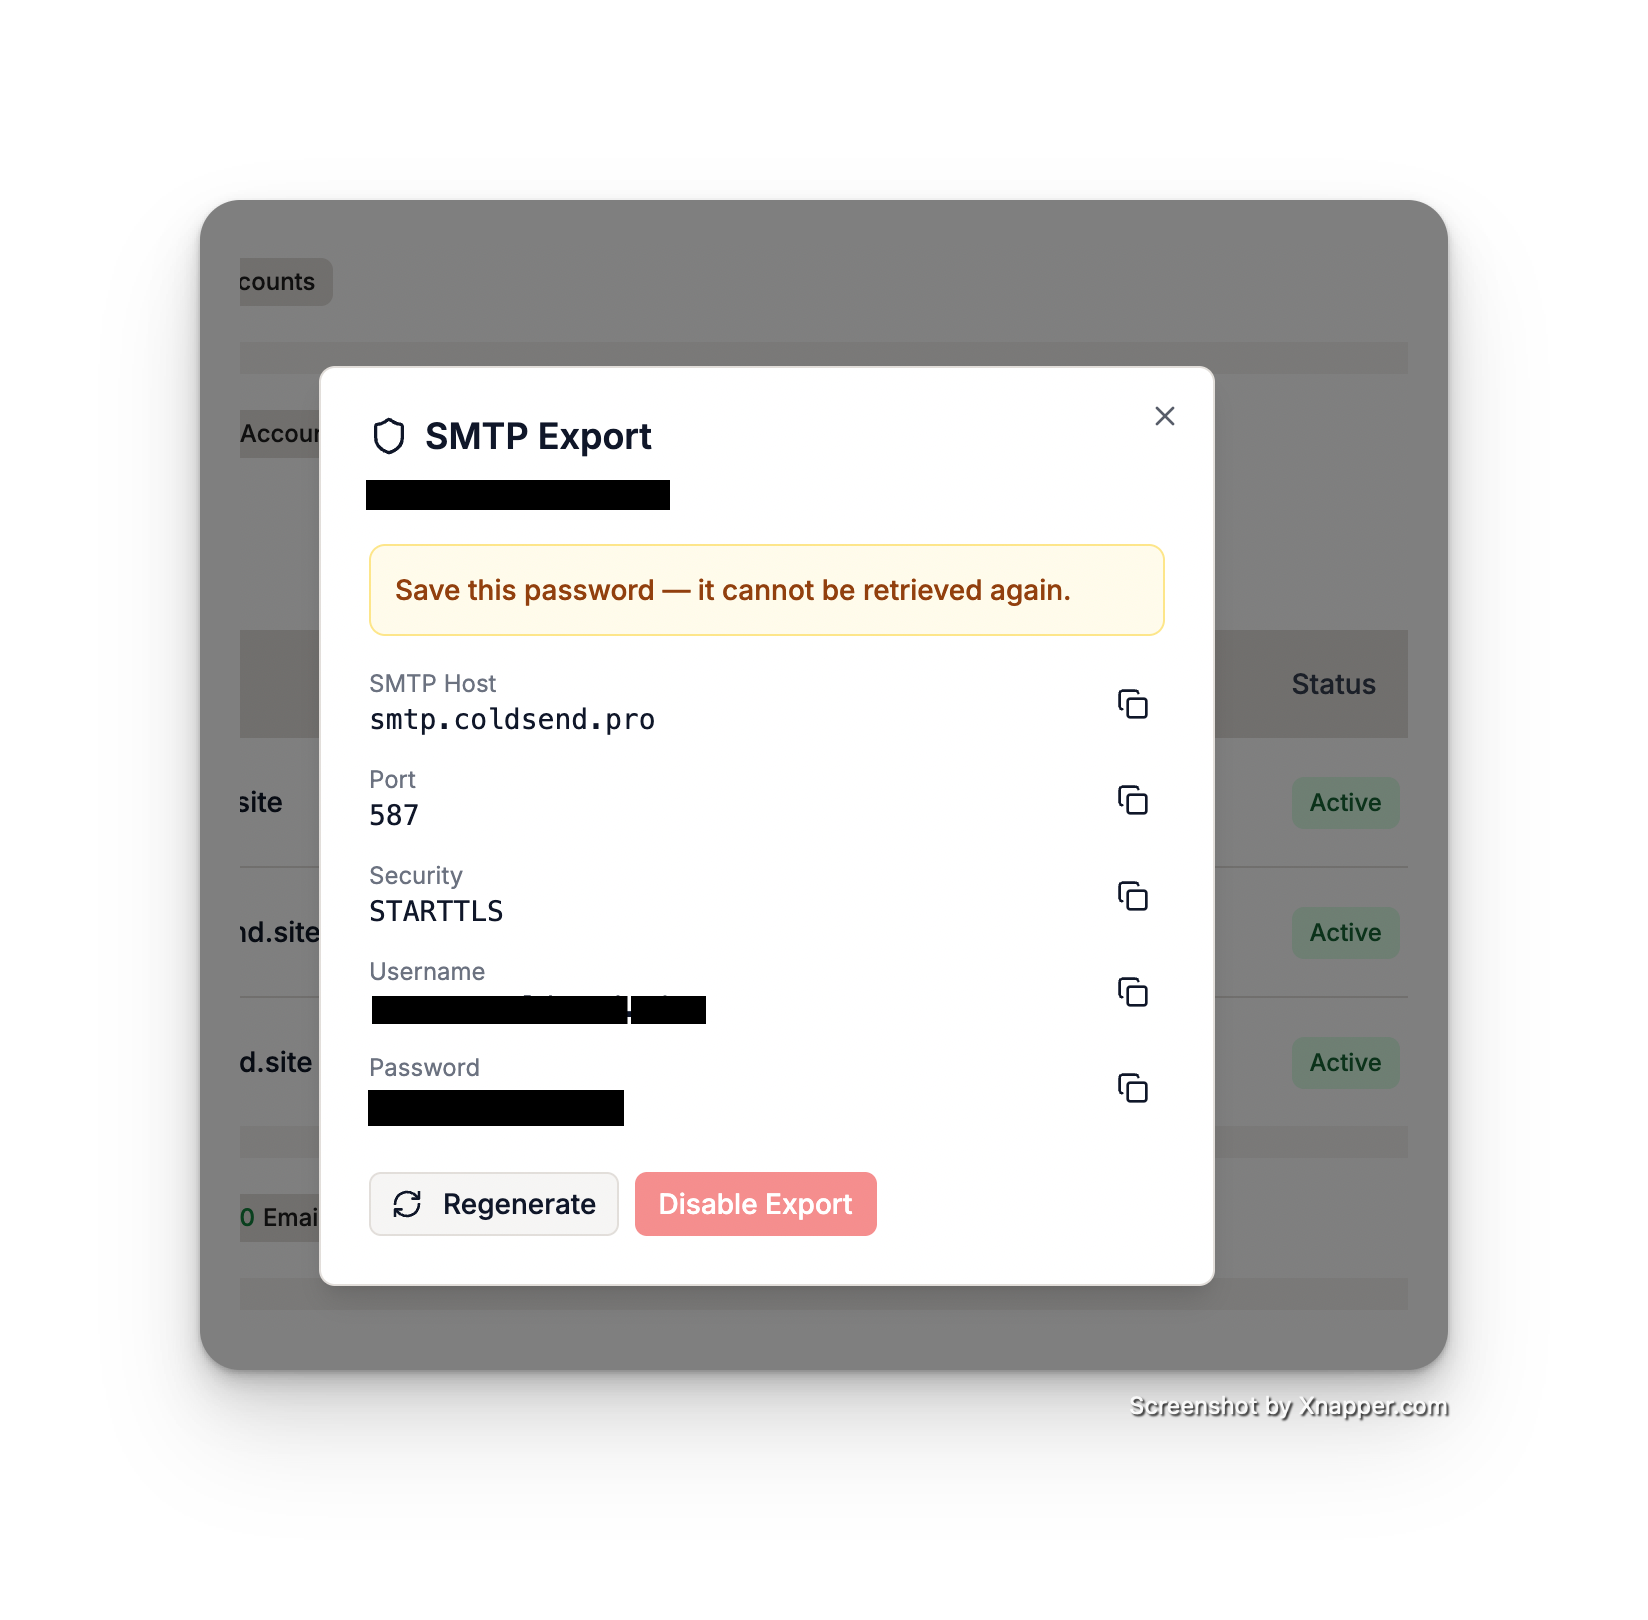 image.png
Step 3: Connect to Your Sequencer
Instantly
- Go to Accounts → Add Email Account → SMTP
- Enter the credentials from Step 2
- Set encryption to STARTTLS
- Save and verify the connection
Smartlead
- Go to Email Accounts → Add Account → SMTP/IMAP
- Fill in the SMTP fields with the credentials from Step 2
- For IMAP (if needed for reply tracking), use:
- IMAP Host: mail.coldsend.pro
- IMAP Port: 993
- Security: SSL/TLS
- Username: your inbox email address
- Password: your original mailbox password (from the bulk CSV export)
- Save and test
Other Sequencers / Email Clients
For any tool that supports custom SMTP, use these settings:
- Server: smtp.coldsend.pro
- Port: 587
- Encryption: STARTTLS
- Authentication: Username + Password (from SMTP Export)
Managing SMTP Export
Once SMTP Export is enabled for an inbox, you can manage it anytime:
- Click the three-dot menu (⋮) on the inbox row
- Click SMTP Export Settings
From there you can:
- Regenerate Password — Creates a new password (invalidates the old one)
- Disable Export — Turns off SMTP relay access entirely
Daily Limits
- SMTP Export has a default daily limit of 50 emails/day per inbox
- This limit is shared with ColdSend campaigns — emails sent via SMTP Export count toward the same hourly quota
- Contact support if you need to adjust the limit
Troubleshooting
Security Notes
- SMTP Export passwords are separate from your mailbox passwords — disabling SMTP Export does not affect normal inbox operation
- Passwords are hashed on our end and cannot be retrieved after the initial display
- We recommend regenerating passwords periodically for security
- Bulk CSV exports contain decrypted mailbox passwords — store the file securely and delete it after use
